There's no perfect time to do a facelift no matter how much you're willing to change things up to feel more confident. Even if it's just a quick and temporary Botox change, there is no time like the present! "I thought this was a home improvement blog Haley!" Oh you bet your bottom dollar it is, I am talking about a facelift to your refresh your fireplace #Home-ies! Even though it's summer, your fireplace should still make you feel at ease since you spend a lot of your time there. Below is the #DIY process we used to revamp and highlight the character of this gorgeous home built in 1910.
Materials:
-
Painter's Tape *Big fan of the 🐸 tape
-
Stencil for hearth border
-
Main Whitewash Paint (we used a sample size of SW Pure White)
-
Lowlight Accent (we used a sample size of SW Alpaca Grey)
-
Stencil Paint (we used a sample size of SW Iron Ore mixed with SW Poised Taupe) *May have also added in some mixed metal spray paint just because we're #extra
-
Small Painting Brushes (water color ones are just fine - classy meets trashy is what we like!)
-
YOUR CREATIVITY & maybe some COCKTAILS🍹🍾🍸🥃!
Total Spend = $60
Total Time
- Without hand-painted corner detail - 4-6 hours
- With hand-painted corner detail - 8 hours
THIS IS HOW WE DO IT

Step 1 - Whitewashing Brick
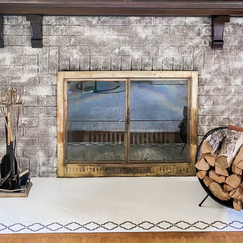
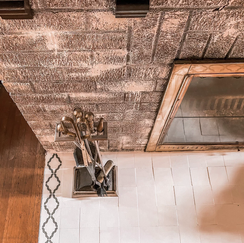
Using your natural bristle brush, dab paint and brush off to get the amount you wish to use. I like to start creating heavier moments and then blending as I go. You can always add more paint so start with lighter coverage to ensure you like the paint to original brick ratio. This brick came with the house which was built in 1910. I loved the warmth it had so wanted to have it peeking through but with contrast against the dark mantle. SW Pure White was mainly used with a little bit of low light added in of SW Alpaca Grey to provide some dimension. Sample size paint is more than enough as a little bit goes a long way. Go with what you feel, the more unique splatters the better!
Step 2 - Paint #Hearth Tile (a.k.a. the tile on the floor in front of fireplace)
Eventually, the homeowners want to purchase new tile, but for now the paint refresh suits for the time being. We rolled it with SW Pure White and did 2-3 coats since the original tile was pretty dark. Let the paint completely dry before painting each coat and moving on to next step to avoid chipping. A blow dryer comes in handy here to help speed the process up if your patience is like mine ;)
Step 3 - Hearth Border + Protective Finish
We found a stencil that went with the wallpaper on the opposing wall where the couch is to create a cohesive look.

Tape down the stencil with painter's tape so the stencil doesn't get feisty and move on ya. Use your sponge brush to add the SW Iron Ore accent color to pop from the white hearth tile. The Iron Ore was a bit too dark so we blended in some SW Poised Taupe and some gold & copper spray paint to tie in the brass on the fireplace screen.
✨Can't resist our love for #MixedMetals ✨
Once this completely dries, roll on the polyurethane protective finish 💋
*One coat should be enough*
Step 4 - Clean & Style
To make this beaut really shine, we polished the brass on the fireplace screen. Then we styled her up with some vases and flowers that tied in the color scheme and brass accents in the room. Adding in a brass fireplace tool set and a log holder sealed the deal on completing the look. This is now the focal point of the room and makes the client happy every time they walk down the stairs and hang out in their family room... just what we love to hear!
BEFORE


Remember: When doing any project on your home, especially a DIY project like this one, as long as you're doing what you like that's all that matters. These are just suggestions and ideas on how to update something in your space that can drastically change the vibe without breaking the bank while having some fun doing it! You're the one that will be living with it so you do you! If everyone liked the same thing, it would be a pretty boring 🌎 to live in, wouldn't it?
Let us know if you decide to do a facelift on any of your home projects as we would love to see what you're working on!